Showing posts with label TipandTricks. Show all posts

Shortcuts Keyboard Untuk Windows 7


Shortcuts keyboard adalah gabungan dari dua atau lebih kekunci, ketika ditekan, dapat digunakan untuk melakukan tugas yang biasanya akan memerlukan mouse atau peranti lain.
Shortcuts keyboard dapat membuat lebih mudah untuk berinteraksi dengan komputer.


Shortcuts Keyboard Untuk Windows Explorer:
  • Ctrl+N = Open a new window
  • Ctrl+W = Close the current window
  • Ctrl+Shift+N = Create a new folder
  • End = Display the bottom of the active window
  • Home = Display the top of the active window
  • F11 = Maximize or minimize the active window
  • Ctrl+Period (.) = Rotate a picture clockwise
  • Ctrl+Comma (,) = Rotate a picture counter-clockwise
  • Num Lock+Asterisk (*) on numeric keypad = Display all subfolders under the selected folder
  • Num Lock+Plus Sign (+) on numeric keypad = Display the contents of the selected folder
  • Num Lock+Minus Sign (-) on numeric keypad = Collapse the selected folder
  • Left Arrow = Collapse the current selection (if it’s expanded), or select the parent folder
  • Alt+Enter = Open the Properties dialog box for the selected item
  • Alt+P = Display the preview pane
  • Alt+Left Arrow = View the previous folder
  • Backspace = View the previous folder
  • Right Arrow = Display the current selection (if it’s collapsed), or select the first subfolder
  • Alt+Right Arrow = View the next folder
  • Alt+Up Arrow = View the parent folder
  • Ctrl+Shift+E = Display all folders above the selected folder
  • Ctrl+Mouse scroll wheel = Change the size and appearance of file and folder icons
  • Alt+D = Select the address bar
  • Ctrl+E = Select the search box
  • Ctrl+F = Select the search box


Shortcuts Keyboard Umum :

  • F1 = Display Help
  • Ctrl+C (or Ctrl+Insert) = Copy the selected item
  • Ctrl+X = Cut the selected item
  • Ctrl+V (or Shift+Insert) = Paste the selected item
  • Ctrl+Z = Undo an action
  • Ctrl+Y = Redo an action
  • Delete (or Ctrl+D) = Delete the selected item and move it to the Recycle Bin
  • Shift+Delete = Delete the selected item without moving it to the Recycle Bin first
  • F2 = Rename the selected item
  • Ctrl+Right Arrow = Move the cursor to the beginning of the next word
  • Ctrl+Left Arrow = Move the cursor to the beginning of the previous word
  • Ctrl+Down Arrow = Move the cursor to the beginning of the next paragraph
  • Ctrl+Up Arrow = Move the cursor to the beginning of the previous paragraph
  • Ctrl+Shift with an arrow key = Select a block of text
  • Shift with any arrow key = Select more than one item in a window or on the desktop, or select text within a document
  • Ctrl with any arrow key+Spacebar = Select multiple individual items in a window or on the desktop
  • Ctrl+A = Select all items in a document or window
  • F3 = Search for a file or folder
  • Alt+Enter = Display properties for the selected item
  • Alt+F4 = Close the active item, or exit the active program
  • Alt+Spacebar = Open the shortcut menu for the active window
  • Ctrl+F4 = Close the active document (in programs that allow you to have multiple documents open simultaneously)
  • Alt+Tab = Switch between open items
  • Ctrl+Alt+Tab = Use the arrow keys to switch between open items
  • Ctrl+Mouse scroll wheel = Change the size of icons on the desktop
  • Windows logo key Picture of Windows logo key +Tab = Cycle through programs on the taskbar by using Aero Flip 3-D
  • Ctrl+Windows logo key Picture of Windows logo key +Tab = Use the arrow keys to cycle through programs on the taskbar by using Aero Flip 3-D
  • Alt+Esc = Cycle through items in the order in which they were opened
  • F6 = Cycle through screen elements in a window or on the desktop
  • F4 = Display the address bar list in Windows Explorer
  • Shift+F10 = Display the shortcut menu for the selected item
  • Ctrl+Esc = Open the Start menu
  • Alt+underlined letter = Display the corresponding menu
  • Alt+underlined letter = Perform the menu command (or other underlined command)
  • F10 = Activate the menu bar in the active program
  • Right Arrow = Open the next menu to the right, or open a submenu
  • Left Arrow = Open the next menu to the left, or close a submenu
  • F5 (or Ctrl+R) = Refresh the active window
  • Alt+Up Arrow = View the folder one level up in Windows Explorer
  • Esc = Cancel the current task
  • Ctrl+Shift+Esc = Open Task Manager
  • Shift when you insert a CD = Prevent the CD from automatically playing
  • Left Alt+Shift = Switch the input language when multiple input languages are enabled
  • Ctrl+Shift = Switch the keyboard layout when multiple keyboard layouts are enabled
  • Right or Left Ctrl+Shift = Change the reading direction of text in right-to-left reading languages


Taskbar Shortcuts Keyboard :

  • Shift+Click on a taskbar button = Open a program or quickly open another instance of a program
  • Ctrl+Shift+Click on a taskbar button = Open a program as an administrator
  • Shift+Right-click on a taskbar button = Show the window menu for the program
  • Shift+Right-click on a grouped taskbar button = Show the window menu for the group
  • Ctrl+Click on a grouped taskbar button = Cycle through the windows of the group 


Cara Submit Blog ke Google Webmaster Tools

Submit blog ke enjin pencarian seperti Google adalah salah satu langkah bagi meningkatkan trafik blog anda. Mungkin ramai di antara blogger sudah submit blog mereka di enjin pencarian dan ada juga sebaliknya. Sebagai seorang blogger pastinya memerlukan trafik untuk blog mereka. Tak kira trafik dari sumber mana pun.
Untuk memudahkan anda mendapat trafik yang lebih konsisten dari enjin pencarian. Cara ini amatlah berkesan bergantung kepada post/entry anda di dalam blog. Di sini, terdapat cara-cara mudah untuk submit blog anda pada enjin pencarian yang popular iaitu Google.


Langkah - langkah Submit Blog ke Google Webmaster Tools


  • Klik pada butang 'ADD/TEST SITEMAP'
  • Selepas klik butang tersebut, kotak kecil akan keluar (rujuk gambar)
  • Kemudian letakkan kod (dibawah) kedalam kotak tersebut jika post/entri anda tidak melebihi 500
atom.xml?redirect=false&start-index=1&max-results=500

  • Jika blog anda mempunyai entri lebih 500, anda perlu letakkan kod tersebut (anda perlu letak satu per   satu)  
atom.xml?redirect=false&start-index=1&max-results=500
atom.xml?redirect=false&start-index=501&max-results=500

  •  Jika blog anda mempunyai entri lebih 1000, anda perlu letakkan kod tersebut (anda perlu letak satu per satu)  
atom.xml?redirect=false&start-index=1&max-results=500
atom.xml?redirect=false&start-index=501&max-results=500
atom.xml?redirect=false&start-index=1001&max-results=500


Apabila sudah selesai , Submit Link tersebut kemudian anda akan lihat pemberitahuan bahawa kod telah ditambah dengan jayanya sebagai sitemap.Anda juga akan melihat bilangan URL yang telah disubmit dan diindex.

Beritahu bagaimana post ini telah membantu anda melalui kotak komen dan tidak teragak-agak untuk bertanya soalan jika anda keliru. =)


Microsoft Office 2010 Toolkit and EZ-Activator v2.2.3


This is a set of tools and functions for managing licensing, deploying, and activating Office 2010. All output from these functions is displayed in the Information Console. All functions are run in the background and the GUI is disabled to prevent running multiple functions, as this could conflict or damage Office 2010. The Channel Switcher, AutoKMS Uninstaller, AutoRearm Uninstaller, Office Uninstaller and Product Key Checker work even if Office 2010 is not installed.


Office 2010 Toolkit Changelog:

2.2.3
-Fixed Visio Key Selection

2.2.2
-Fixed AutoKMS and AutoRearm Settings version mismatch
-Windows XP users can use the key checker if Office 2010 is installed, otherwise it is disabled.

2.2.1
-Added more KMS Keys and Checker support for more products.
-Fixed file browsing when using Customize Setup functions.

2.2
-Added ability to choose KMS Port, separate KMS PIDs for Windows and Office. Settings have been changed alot.
-Can check and install/uninstall Windows product keys. Can use different KeyList.ini files for each supported checkable product.
-Confirmation ID and Backup Key Prompt boxes remain centered and in front after minimizing and then restoring toolkit.
-Check if licensing is in a proper state before running certain functions.
-Fixed loss of rearms during rearm check and improved Backup error detection accuracy.
-KMSEmulator runs in RAM to reduce Anti-Virus problems.
-Many UI Changes and internal changes/bugfixes.
-Nuked/Discontinued support and install of AutoKMS Service, will uninstall if you uninstall AutoKMS.


Download Nero Burning Rom 11 Full JumboFiles Link


Nero Burning ROM gives you full, customized control of your burning projects. You can – among other things – define the file system, the length of the file name and the character set; you can also change the disc label. And of course, you can also customize the Nero Burning ROM toolbar and change the keyboard shortcuts.

Download Links (JumboFiles)

Size:200MB

Size:145MB


Cara Mengukur Denyutan Nadi


Untuk mengukur denyutan nadi adalah senang. Ia tidak memerlukan sebarang peralatan. Walaubagaimanapun, jam yang mempunyai unit kaunter saat digital amat membantu.
Pusing tapak tangan dengan cara menghadap ke depan. Letakkan indek dan jari tengah tangan yang sebelah lagi ke pergelangan tangan anda sekurang-kurangnya seinci di bawah tapak tangan. Tekan jari anda ke bawah antara gugusan tendon tengah dan luaran. Anda akan merasa denyutan nadi. Kira berapa kali ia berdenyut dalam masa 10 saat, dan kemudian gandakan dengan 6. Ini akan memberikan bacaan nadi anda untuk seminit.

Contoh:-

Jika anda mengira 12 denyutan untuk 10 saat, gandakan 12 x 6=72. Ini bermakna kadar denyutan nadi anda ialah 72.
Satu cara lagi yang popular adalah dengan mengukur pada bahagian leher.Ini selalunya dilakukan semasa menjalani senaman.Formulanya adalah sama seperti dengan mengukur pada pergelangan tangan. Mengukur kadar denyutan nadi anda pada waktu pagi atau semasa duduk tanpa sebarang senaman dikenali sebagai 'Kadar Denyutan Masa Rehat'.

APA YANG DIMAKSUDKAN DENGAN KADAR DENYUTAN JANTUNG NORMAL?

Denyutan nadi masa berehat dalam anggaran 60-90 boleh dianggap sebagai kadar denyutan jantung yang normal. Denyutan jantung anda adalah bergantung kepada beberapa faktor termasuklah tahap kecergasan dan tekanan anda. Walaubagaimanapun, jika nadi anda berterusan berada pada tahap atas 90, anda patut pergi berjumpa doktor.Keadaan ini dipanggil 'tachycardia' (kenaikkan denyutan jantung).
Kebanyakkan atlit mempunyai kadar nadi dalam lingkungan 40-60, bergantung kepada tahap kecergasan mereka. Secara umumnya, kadar nadi yang rendah adalah bagus, tetapi jika kadang kala kadar nadi yang anda kira didapati tidak stabil ( contoh seperti rentaknya hilang), ambil kadar nadi anda untuk satu minit. Jika anda mengalami keadaan ini pada kebanyakkan masa, anda harus berjumpa doktor anda.
Keadaan ini dipanggil 'bradycardia' dan boleh menjadi berbahaya terutama bila tekanan darah turut rendah. Simptom-simptomnya adalah seperti letih, kurang tenaga dan pengsan.Jika ini berlaku, anda perlulah mendapatkan bantuan perubatan dengan segera. Banyak faktor yang mempengaruhi kadar nadi. Ini termasuklah emosi, suhu, keadaan postur (duduk, berdiri atau berbaring) dan juga saiz badan anda.

KADAR DENYUTAN JANTUNG YANG HENDAK DISASARKAN

Semasa mengambil bahagian dalam program senaman, adalah menjadi penting untuk anda mempunyai matlamat untuk disasarkan apabila anda melakukan aktiviti senaman itu. Untuk lebih baik, tentunya anda mahu tidak terlalu susah atau senang.
Berikut adalah formula mudah untuk anda meramalkan Kadar Denyutan Nadi Yang Maksimum( Maximum Heart Rate) dalam industri kecergasan ini.

Formula:-

Ambil 220 dan tolakkan dari umur anda
Ini akan memberi kadar denyutan nadi ramalan yang maksimum. Sebagi contoh, jika anda 42 tahun, tolakkan (220-42=178). Ini memberitahu limit pysiological maksimum anda, sama seperti berapa pantas jantung anda berdenyut dalam seminit.
Kebayakkan program senaman menyarankan jika seseorang baru sahaja bermula, kadar nadi semasa bersenam tidak akan sampai 60-70% dari kadar maksimum denyutan nadi.
Sebagai contoh, 60% dari 178=107 bpm, dan jika anda berterusan senaman, peratusan bagi kadar maksimum nadi sepatutnya dijadikan matlamat untuk dinaikkan.
Pengiraan zon kadar denyutan nadi yang dikehendaki (Target Heart Rate):-
Mulakan dengan kadar maksimum nadi anda seperti di atas. 
Gandakan kadar maksimum denyutan nadi (Maximum Heart Rate) anda dengan 0.8 untuk menentukan limit bahagian atas zon kadar nadi yang dikehendaki.(Upper Limit Target Heart Rate Zone) (bahagikan dengan 6 untuk mendapatkan kadar untuk 10 saat). Gandakan kadar maksimum denyutan nadi (Maximum Heart Rate) anda dengan 0.6 untuk menentukan limit bahagian bawah zon kadar nadi yang dikehendaki..(Lower Limit Target Heart Rate Zone) (bahagikan dengan 6 untuk mendapatkan kadar untuk 10 saat). 


Contoh:-
Untuk orang yang berumur 42 tahun,220-42= 178 Kadar nadi maksimum ( Maximum heart rate)178 x 0.8 = 142 limit bahagian atas zon kadar nadi yang dikehendaki. (Upper limit of target heart zone (142/6= 24 per 10 saat)178 x 0.6 = 107 limit bahagian bawah zon kadar nadi yang dikehendaki. (Lower limit of target heart zone (107/6= 18 per 10 saat)Kadar maksimum denyutan nadi anda adalah kadar denyutan yang jantung anda patut sampai selepas senaman yang memenatkan.Kadar denyutan nadi anda patut diukur semasa tahap pemanasan, ketika bersenam dan selepas bersenam. Jika semasa senaman anda mencapai tahap limit bahagian atas zon kadar nadi, anda patut menurunkan tahap senaman anda. Dan jika pada penamat kadar nadi anda adalah kurang dari limit bahagian bawah zon kadar nadi yang dikehendaki, anda patut bersenam lebih pada masa akan datang.

KADAR DENYUTAN NADI PEMULIHAN
Salah satu cara untuk mengetahui samada anda mendapat manfaat dari senaman yang anda lakukan adalah dengan cara mengukur Kadar Denyutan Nadi Pemulihan (Recovery Heart Rate).
Ia mengukur berapa cepat anda kembali kepada keadaan Kadar Nadi Semasa Berehat (Resting Heart Rate) selepas bersenam. Untuk mengukur Kadar Denyutan Nadi Pemulihan (Recovery Heart Rate):
Ambil nadi anda untuk 10 saat sebaik sahaja anda lepas bersenam. Tuliskan nombor tersebut. Seminit kemudian, ambil lagi kadar nadi anda dan tuliskan. 
Tolakkan nombor pada keadaan nadi pertama dengan kadar nadi ke-2. Maka ini adalah Kadar Denyutan Nadi pemulihan. 


Sumber: http://www.ozone.com.my


XLaunchpad - Aplikasi LaunchPad Mac OS X Kepada Windows

Berikutan daripada fungsi-fungsi terbaru dan gaya menarik yang terdapat pada sistem operasi Mac, banyak aplikasi telah dibangunkan dengan mengambil idea – meniru paparan dan fungsi terbaru daripadanya. Diantara yang menjadi fokus orang ramai adalah aplikasi Launchpad yang memudahkan navigasi dan kelancaran pengguna dalam melancarkan shortcut. Dan apa yang menariknya, kini anda juga boleh mendapatkan fungsi tersebut pada sistem operasi Windows dengan XLaunchpad.


Aplikasi XLaunchpad ini dibawakan oleh pembangun XWidget  (alternatif Rainmeter) dan ia merupakan pelancar yang mudah dikendalikan dengan kepelbagaian fungsi dan tetapan untuk kesesuaian pengguna.


Selepas pemasangan XLaunchpad, anda boleh aktfikannya dengan membawa kursor disisi atas penjuru kiri atau dengan menekan butang F12.  Sebarang tetapan lanjutan serta penambahan pautan dapat dilakukan dengan klik kanan dan pilih menu bersesuaian.


XLaunchpad turut diperkenalkan dengan fungsi Desk Mod yang membolehkan anda menetapkan XLaunchpad sebagai pengganti desktop sekaligus menjadikannya lebih menarik dan kelihatan kemas.


Facebook Auto Like Bot

\
Salam sejahtera dan salam 1 Malaysia

Pernahkah anda mendengar ''Facebook Auto Like Bot''...
Disini saya akan menunjukkan apa itu "Facebook Auto Like Bot''


Screenshots


Anda juga boleh adjust settings ....

Masa boleh diubah pada Like Delay dan boleh juga ubah Maximum Likes yang anda mahu.


Tekan Like All untuk memulakan like status....


Download Links


http://adf.ly/5s9HI


*p/s: File removed or violation, please P.M or comment


Akses Aplikasi Chrome Dengan Pantas Melalui LaunchBoard


Dengan pengenalan aplikasi web, dan juga Chrome WebStore, mungkin ramai pengguna pelayar web daripada Google itu memasang pelbagai aplikasi web padanya, dan untuk memudahkan anda mengakses segala aplikasi dengan pantas, sebuah aplikasi khas dibangunkan oleh pembangun ringkas dinamakan sebagai LaunchBoard.

Melaluinya, ia membawakan rekabentuk seumpama yang terdapat pada iOS untuk melihat senarai aplikasi anda, dimana para pengguna boleh menyusun sehingga 16 aplikasi pada satu halaman. Sama seperti pada iOS, ia memperlihatkan bilangan halaman aplikasi melalui sebuah titik dibahagian bawahnya.

LaunchBoard membolehkan para pengguna mengakses aplikasi dengan mudah, serta menyusunnya untuk akses pantas. Anda juga tidak lagi perlu menjadikan bar bahagian atas pada pelayar web anda penuh dengan ikon kecil aplikasi, ataupun ke halaman tab aplikasi untuk mengaksesnya.

Bagi mereka yang berminat, dan menggunakan Google Chrome, anda boleh memasang LaunchBoard pada pelayar web anda secara percuma hari ini.


Cara Dapatkan Domain Percuma

Salam sejahtera dan salam 1 Malaysia , Tahukah Anda apa itu Domain ? Rujuk kat sini...
Kepada sesapa yg tak mampu beli domain,
aku akan tunjukkan cara untuk dapatkannya dengan percuma.... xD

Contoh Domain : .com .net .biz .org .info ... etc


Penerangan Secara Ringkas


  • Buka Websites ni....   [Klik Sini]
  • Klik Butang "Get Your Free Websites"
  • Isi Form Dan Check Email Untuk Verify.
  • Bila Dah Sampai Page Payment Pegi Sini
  • Buat Account Entropay [Anda boleh gna http://www.fakenamegenerator.com/ untuk isi maklmat2 tersebut]
  • Isi Form Dia Dan Pilih 'Canada' Dan Tulis Name Of  Bank Atau Ape2,Pastu Check Email Untuk Verify
  • Dapatkan Prepaid Credit Card Information Kat Entropay's Website
  • Apply Anda punya Kad Kredit Information  Dekat Intuit Dan Teruskan...


Tutorial Video Yang Lebih Details


#p/s: kalau ada kekonfiusan boleh la PM saya.... :D

Credit to: NinEtYSeVenxz


Buang Timeline pada Facebook (Kesan Pada Kita Sahaja)


Selama ni ramai yang tertanya - tanya macam mana nak buang timeline pada Facebook mereka,
pada hari ini saya akan tunjukkan caranya , tapi hanya bekesan pada kita sahaja....

Klik Link ni... dan pilih browser yg anda guna...

*p/s: tidak berkesan pada pc lain ... kecauli pc tersebut guna addon tu[timelineromover]...


Tukar Windows 7 anda Seperti iOS5


Adakah anda tahu apa itu iOS? adakah anda pernah menggunakannya...
tak kira lah sekarang ni sama ada anda tahu atau pon tak, iOS adalah System operasi bagi gadget iPhone, iPad dimana ianya hanya ada pada produk apple...
yang menariknya antaramuka ios ini amat menarik pada iphone & ipad lebih2 lagi dengan kualiti screen HD...

Tidak kurang hebatnya jika Windows 7 anda kelihatan seperti iOS5...
ok.. sekarang saya tunjukkan cara2 nak buat windoows 7 kelihatan seperti ios..

Pertama anda perlu download iOS SKIN PACK http://freebiesbuzz.com/free-download-ios-skin-pack-for-windows-7-32-bit-and-64-bit/
Dimana software ini akan mengubah semua style windows 7 anda menjadi kelihatan seperti iOS.. fungsinya sehingga mengubah paparan booting apple, wallpaper desktop, bunyi startup, shudown, icon, animation icon (rocketdock), taskbar, kedudukan taskbar kpd top, & mcm2 lagi...

1. anda hanya perlu download & install.. sekiranya anda menggunakan windows 7 64bit download yg 64bit.. jika 32bit download yg 32bit punya... cara nk tahu 64 or 32.. rightclick kt mycomputer & properties perhatikan pd system type...


Jika ianya tidak memuaskan bagi anda.. anda jgn risau, tetapan windows anda boleh dikembalikan kpd yang asal dengan hanya uninstall semula iOS SKIN PACK tersebut pd control panel> program and feature>cari iOS5 SKIN PACK...

Sumber: BualKomputer.com


The Top 7 Best Linux Distributions for You


There are various approaches to answering this question. The broad answer is: "any of them," but that's not very helpful if you're just looking for a place to start.
The problem is, there never can be one best Linux distribution for everyone, because the needs of each user tend to be unique. Telling someone who's looking for a good introductory distribution to try Gentoo, for instance, would be a mistake because for all its positive qualities, Gentoo is decidedly not a beginner's distro.
All too often, Linux aficionados will tend to list the distributions they like as the best, which is fair, but if they are not aware of their audience, they could suggest something that does not meet that person's needs. Finding a good Linux distribution is like finding a good match in an online dating service: good looks aren't the only quality upon which to judge a Linux distro.
To help users discover the Linux distribution that's best for them, this resource will definitively list the best candidates for the various types of Linux users to try. The use-case categories will be:
  • Best Desktop Distribution
  • Best Laptop Distribution
  • Best Enterprise Desktop
  • Best Enterprise Server
  • Best LiveCD
  • Best Security-Enhanced Distribution
  • Best Multimedia Distribution
Once you find the best Linux distribution for your needs, you can visit our Linux Migration Guides to assist you in installing and using the one you'd like to try.

Best Linux Desktop Distribution

There are a lot of Linux distributions that have the primary focus of becoming the next best desktop replacement for Windows or OS X. Of all the categories in this list, this is the most sought-after, and contentious, group of distros.
While it would be ideal to include many distributions on this list, the reality is that there really needs to be just one "best" Linux distribution. For early 2010, that distro has to be Canonical's Ubuntu.
Ubuntu edges out its closest contenders, Fedora and openSUSE, because its development team is constantly focused on the end-user experience. Canonical and the Ubuntu community have spent a lot of time and resources on bringing ease-of-use tools to this distribution, particularly in the area of installing Ubuntu and installing applications within Ubuntu.
In addition, Ubuntu's level of support for its desktop products is highly superior, which is important in this class of distributions since it is the most likely to contain users new to Linux. Both the official and unofficial Ubuntu documentation is robust and searchable, a big plus.

Best Linux Laptop Distribution

Laptop distributions almost fall into the same category as desktop users, but there are a number of key differences that make the criteria for evaluating a good laptop distribution important. Power management, docking tools, and wireless ease-of-use are critical to users on the go, as is having a distro that meets those needs.
Right now, the best laptop distribution is openSUSE, one of the lead contenders for the desktop honors. On the laptop, openSUSE shines with great connectivity tools, such as an easy-to-use networking toolset that not only handles WiFi connectivity, but also CDMA/cellular modem connections.
openSUSE also deals with docking stations for laptops very well, including dual-monitor management on the fly. Power management is very granular, which is great for detailing various power needs you might find yourself needing.

Best Linux Enterprise Desktop

This category is replete with great contenders as well, and it's difficult to highlight just one. At the end of the day, though, the nod must be given to SUSE Linux Enterprise Desktop (SLED).
The reason is simple: while SLED and its primary competitor Red Hat Enterprise Linux Desktop are nearly identical in features and support performance, SLED has the advantage of the openSUSE Build Service, a free and open service that lets applications be built and delivered to SUSE Linux and openSUSE products (as well as Red Hat and CentOS).
This is a very important differentiator in enterprise desktop development, as it means that SLED has the current advantage of application building and deployment in the enterprise arena.

Best Linux Enterprise Server

Again, in this category it really comes down to two main contenders: Red Hat Enterprise Linux (RHEL) andSUSE Linux Enterprise Server (SLES). Given the pick for the Enterprise Desktop category, you might expect SLES to get the "best of" label here.
But, when all factors for the enterprise server are weighed, RHEL is still the king of this particular hill.
Red Hat edges out Novell with its server product, because RHEL users get a deeply mature distribution, and Red Hat's support structure is second to none in the enterprise channels.

Best Linux LiveCD

As Linux technology improves, users can easily choose the LiveCD version of practically any of the Linux distros listed here to get the best LiveCD experience for their needs.
There is a specialized class of LiveCDs, however, that offers users utilities and tools for the specific purpose of repairing existing Linux and Windows installations. These distros are very useful to have regardless of what primary Linux distribution you like to use, because in a crisis they are invaluable to own.
In this class of distribution, KNOPPIX is hands-down the most complete and useful distro. Loaded on a CD or USB storage device, KNOPPIX will let you recover from nearly any rare Linux system crash as well as the much-less-rare Windows breakdowns.

Best Linux Security-Enhanced Distribution

Linux is inherently very secure compared to other operating systems, but there's always room for improvement.
One of the challenges for locking down Linux is if you are not careful, you can take away too much functionality. Another challenge is that the best security-oriented Linux distro, SELinux, is historically known to be difficult to configure correctly. Still, if security out of the box is your priority, this is the best place to begin.
Another approach is the white hat method: using security and forensic tools to examine your existing installation, determine the holes, then lock your system down based on what gaps you find. If you have the time and inclination, this is a great way to do it, because this will get any existing system more secure right away.
For the white hat approach, the best distribution is BackTrack Linux, a dedicated penetration testing distro that will enable you to safely try to crack any system you are caretaking. Its toolset and strong community give it the advantage in this category.

Best Linux Multimedia Distribution

General Linux distributions have come a long way in terms of multimedia performance. Rare is the audio or video file that can't be played on Linux. Music services such as Rhapsody and video sites like YouTube and Hulu are also standards-compliant and accessible to Linux users.
Still, for those users who are multimedia creators as well as consumers, there are Linux distributions that contain powerful tools for audio and video editing.
The best in this class is currently Ubuntu Studio. For audio, video, and graphic production, it contains a very complete set of tools, as well as format and codec support for a huge range of multimedia formats.
The applications contained in Ubuntu Studio are the same or similar to those used by major studios to create cutting edge work, so users are getting the best apps, coupled with the strong support ethos already found in the Ubuntu community.
In Linux there are as many opinions as there are lines of code. This represents one view of the best in Linux. What's yours?


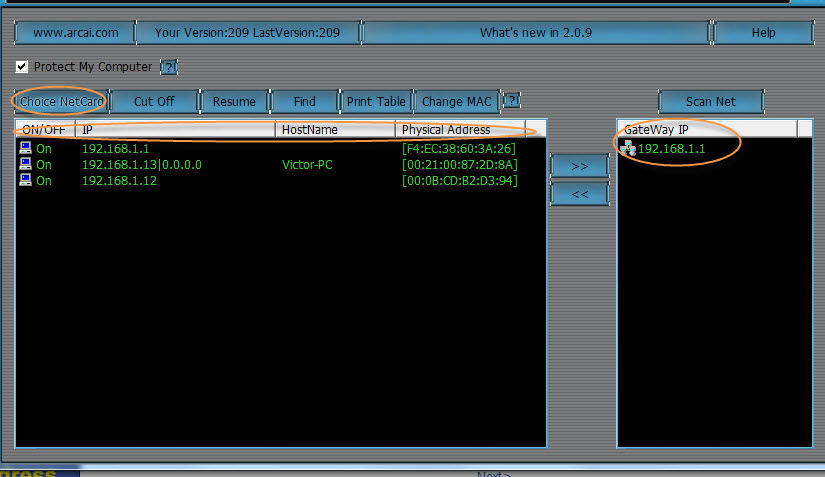
Cara Megesan Dan Cut Seseorang Yang Menguna WiFi Anda

Sebelum ni saya ada tunjuk tutorial tapi hanya boleh mengesan sahaja iaitu  Wireless Network Watcher.
Anda boleh muat turun tool ini di link tersebut :


Mengesan Siapa Yang Mengguna WiFi Anda


Wireless Network Watcher adalah satu utiliti kecil yang dapat mengimbas kesemua rangkaian tanpa wayar (Wireless) anda dan memaparkan senarai semua komputer dan peranti yang disambungkan ke rangkaian anda. Bagi setiap komputer atau peranti yang disambungkan ke rangkain anda, maklumat yang berikut akan dipaparkan : Alamat IP, MAC Address, syarikat yang membuat network kad, dan pilihan nama komputer.
Anda juga boleh mengeksport senarai peranti yang bersambung ke dalam html/xml/file csv/teks, atau menyalin senarai ke clipboard dan kemudian tampalkan ke excel atau spreadsheet aplikasi yang lain. Aplikasi ini berjalan pada Windows XP, Windows Vista dan juga pada Windows 7.


Muat Turun Wireless Network Watcher di SINI


Ulasan perisian MostSMS Program, hasilan @cybernetic88

Pada tahun 2010, penulis pernah memaparkan ulasan tentang perkhidmatan SMS percuma yang dikendalikan oleh Cypearl Sdn. Bhd. Sehingga hari ini, pengguna boleh menghantar SMS percuma ke seluruh negara ke mana-mana jua operator telefon di Malaysia.


Baru-baru ini, cybernetic88 yang terkenal dengan hasilan Radio Malaysia V4, telah menghasilkan hasil kerja baharu beliau, iaitu MostSMS Program.


Perisian ini mempunyai ciri-ciri yang hampir sama seperti di laman MostSMS. Namun, pengguna tidak perlu lagi mengakses ke laman tersebut untuk menggunakannya.

Pertama kali mencuba, satu ralat muncul berbunyi begini:
Component ‘Mscomctl.ocx’ or one of its dependencies not correctly registered: a file is missing or invalid.
Setelah menghubungi pembangun, rupa-rupanya terdapat plugin yang tertinggal. Andai kata pembaca juga mengalami masalah yang sama seperti penulis, muat turun di sini dan letakkan bersama di dalam folder MostSMS Program. Insyallah, selesai masalah.
Setelah mencuba beberapa kali, penulis mendapati bahawa antara mukanya yang ringkas dan mudah dikendalikan. SMS yang dihantar terhad kepada 3 nombor telefon sahaja dalam satu-satu masa manakala had maksimum satu SMS ialah 94 aksara. Setiap mesej yang sampai ke penerima akan direkodkan untuk tujuan semakan peribadi.

Pastikan sambungan internet ada sebelum menghantar SMS saudara. Beginilah rupanya SMS yang diterima di telefon.


Selamat mencuba!


Muat Turun mostSMS Program Version 1 di bawah :
http://adf.ly/3T4JN